Showing posts with label makeuptips. Show all posts

Wednesday, March 4, 2015

LA Splash Cosmetics Lip Couture Review

I have a new addiction and I have to blame my dear friend, MIMO, who sent this packages of lipstick. She said I will love it because this liquid lipstick is extremely matte and has an amazing long lasting formula. I don't know whether this lipstick contains parabens or not, but they mention it that the products are animal-friendly or in another way of saying "they didn't test it to animal". I really wish that this product is also parabens-free but I still have no answer until now. I googled about it but the fact remains unclear.
But let's talk about why I love this liquid lips so much.

LA Splash "Charmed" is a great Dupe for Anastasia Beverly Hills "Pure Hollywood"


NO FILTER / UNEDITED

1. PRICE

The price is extremely cheap and affordable. I have no complains at all with the price. It costs around $12-$14 here in Indonesia. Not bad.

2. SHADE RANGE

It provides the range from warm to cool tone which I enjoy so much. Because more variations are good. It gives you the various way to mix the shades too.

3. THE TEXTURE

I find LA Splash a little buttery and dries really fast on my lips. Maybe it is different in some people's case but it works just fine with me. And it is sooo common that you must apply lipbalm before putting any lipstick on. Just a friendly reminder.

4. PACKAGING

It's not bad at all. La Splash adapted the looks of Anastasia Beverly Hills liquid lips packaging concept. Transparent/glass tube with graphired logo.


5. LONG LASTING

I had breakfast and lunch, the lips stood strong through the whole meals. Until I ate something fried and it started to fade a little. But it was not completely vanished. I got to say, it was pretty impressive for such an affordable lipstick.


CONCLUSION

I intend to post this upside down LOL
I think this liquid lipstick worths the rave. The price definitely makes it better. And the quality was not disappointing at all. At least the lipstick works great on me and I just ordered another 4 shades to add more to my collection! Speaking about a lipstick freak hahaha :D


Sunday, February 15, 2015

Warm, Neutral Or Cool?

Before reading any further, I would like to remind everyone that I am NOT an expert in this. I only know a thing or two (maybe three) about finding the best shade or classify yourself into which chart. The biggest question and the hardest to answer is "what is the best chart for your skin tone?".
And for this article I will share a bit of my knowledge so hopefully after reading this, you will understand that we are different but there is a thin life that will help us as sisters to decide which ones are we.
That thin line is the "TINT" or you may know it as well as "UNDERTONE".

First let us separate the chart into the easiest options:

1. LIGHT
2. MEDIUM
3. DARK


Now let us find in which sections are you. I consider myself as "pretty light", i am in the middle, i am in between. Now let's find my "tint" or "undertone", I can fairly decide that i am light-medium or neutral. Then move on to the next step, decide which  UNDERTONE will suit me best :

1. COOL
2. NEUTRAL
3. WARM


This is when you get a headache, what does cool undertone mean? What is warm undertone? or more big questions to decide in which charts are you hahaha! This takes a serious science for us girls to find the best match. hahaha!
But let me help you out with this chart that I quoted from sunglasseswarehouse./com

Undertone is the skin under your surface that will crete the tint of your tone

But honestly, I am quite confident that you can always create your own undertone as your wish by using the right tools (foundation, brush, techniques, etc) to build the solid base. I know that I am light but I LOVEEEEEE COOL shades like crazy in love. So to pull that colour, I will create the right base on my face. I know building the right base or foundation is not easy if you can't even find the RIGHT foundation to match your skin.

Variation of Foundation that I own. Mostly beige, light to medium, and fair light. But I also prepare one warm colour to mix with the lighter shade.

Or you can try this way, by using metal to identify which undertone are you. If you look better with silver, you are COOL UNDERTONE. If you look better in gold, you are WARM UNDERTONE. But if you feel like you can pull the look with both metals then you are a NEUTRAL like myself.

Also you need to know the difference between NC and NW in MAC product code. I asked the Beauty Assistant once. And she told me that NC stands for NEUTRAL COOL (Cool undertone) -that explains why in Indonesia we are mostly using the NC shade- and NW stands for NEUTRAL WARM (Warm Undertone). I'm using both code NC and NW but in different products, like my studio fix is NC20-25 and my pro longwear concealer is NW20-30.

UNDERTONES does not mean more pale or more darker, it explains more about the tint under your surface tone. I hope this article will help you ladies to decide which ones are the best for you.
If you are still having a hard time, then grab one of your best foundation shade and go to http://www.findation.com to find the right shade for you based on your previously owned-foundie.


GOOD LUCK, LADIES!

Valentine's Day Makeup (LatePost)

Before Bronzer. Then I decided more bronze
 to add more dimension to my face.
This was my makeup for last Valentine yesterday.
Basically all my makeup using this equipments but only for special ocassion though :p

- Primer : Laura Mercier & Benefits Porefessional.
- Eye primer : The Balm Cosmetics.
- Foundation : Chanel Vitalumiere shade # 40 Beige
- Contour Anastasia Beverly Hills Contour Kit shade "Havana".
- Bronzer MAC mineralizer "Dark".
- Highlight & Conceal under the eye : MAC prep and prime "Radiant Rose" mixed with MAC Pro Longwear Concealer NW20. Set it with Anastasia Bevely Hills Contour Kit "Banana".
- Brows : Anastasia Beverly Hills Dipbrow Pomade in shade "Dark Brown" and Clear Brow gel.
- Eyeshadow base : MAC Paint Pots "Soft Ocre".
- Eye makeup : TooFaced Chocolate Bar Palette. (won't be a Valentine without a chocolate bar, right?)
- False Lashes : Elise # 6448
- Mascara : Lancome Hypnose Doll Eyes Waterproof.
- Blush :  NARS Orgasm.
- Setting Powder : Makeup Forever HD Powder.
- Brushes : Sigma, Real Techniques and Zoeva.
- Lip : Anastasia Beverly Hills Liquid Lips "Baby Pink".


We had ice cream and watched 2 movies in a row haha!
                                
After added on some bronzers to my face.
My husband sitting on the back
with his lazy eyes  :p

He shopped a little and got me THE BEST CHOCOLATE BAR for Valentine!
We sure had a great Valentine's Date together. This was our third Valentine together and we wish more Valentines together ahead! And I love how my makeup stood strong the whole day to night without looking creasing and did not need any touch up on the face and lips! Happy wife, Happy life :D
My makeup still strong at 1am in the morning!
And look at that cute "Marriage Memoir" of us in the background :D


HAPPY VALENTINE'S DAY !! 


Thursday, February 12, 2015

How to work with Powder Brushes

It is common to use sponge for your compact powder, but in some case, the using of the powder brush is slightly more effective to gain the perfect result. Different techniques of makeup are making the using of brushes highly important. Powder brushes are actually very basic. And some of you might find it comfortable in various way. But this is what I find as the most effective way of using powder brushes.


1. Big, Fluffy, Firm Brushes for Powder.
I find the using of big round fluffy brush is only efficient for powder or translucent texture. It will hold more product to the top of your brush but also in the same time will create the perfect blend on your face. That way, you will get the perfect look to lock your makeup setting. I usually apply it in a circle way, not by pressing the brush to the face.

I love using Real Techniques Powder Brush to set my translucent powder.


2. Flat Top Brush or Half round Brush for Compact Powder.
Like I mentioned previously, we usually use sponge to apply our compact powder. I honestly think that we will get more beautiful result if we are using flat top brush or half round brush instead. The texture of compact powder is clearly different than translucent one, that is what makes it also needs a different technique by using a different type of brush. My Sigma Kabuki F80 not only great for foundation application but also works great for compact powder. Sponges are great for blotting but still it will not cover your makeup as well as using flat top brush or half round brush. The technique is also different from the big fluffy brush, with flat top brush I usually stipple the brush to the face or press it to create an amazing airbrush result. This technique also really good for those who have an oily skin.


Beside Sigma Kabuki F80, I also love using Real Techniques Buffing Brush to apply my compact powder.


Tuesday, February 10, 2015

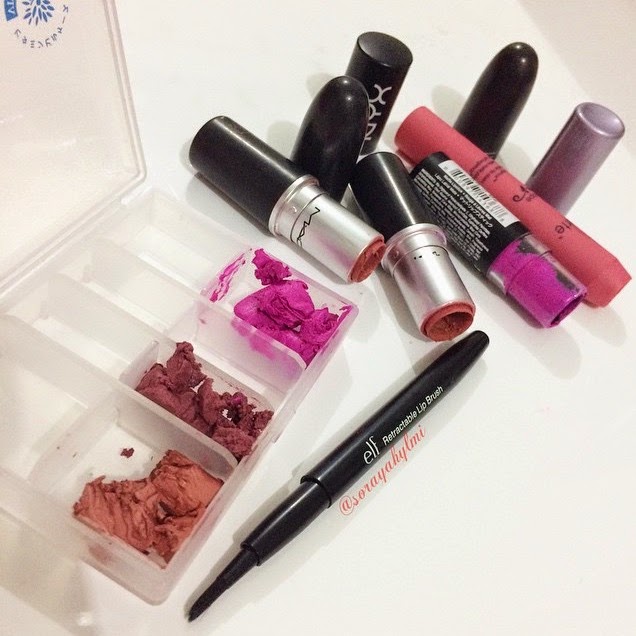
How To Depot All Your Broken Lipsticks


This is a very simple solution for all of you lipstick lovers who do not want to give up on your broken lipsticks. They may gave up on us, but we don't give up on them! LOL.

  1. Find the replacement palette
    I prefer plastic. Any plastic storage will do. You can find this small storage in bookstores or drugstores. Clean them up before you use them with alcohol or germ-killer (this is optional).
  2. Use a pointed small size knife or flat metal to depoting the lipstick
    Basically anything pointy that you can use to take out the leftover from the packaging. You can also use the Q-tip but throw the tip and use the stick only. Because if you keep the tip on, that will be a waste.
  3. Use lip brush to apply your depoted lipstick
    Voila! You can use them now until the last drop! And the pros about it that you can carry the palette around with wide variations of lipstick shade. FUN isn't it?